
Java, a cornerstone of software development and application deployment, remains incredibly relevant in today’s digital landscape. From robust enterprise applications and mobile development to scientific computing and web servers, Java’s “write once, run anywhere” philosophy has cemented its position as a versatile and powerful platform. For macOS users, installing Java is a crucial first step, whether you’re a seasoned developer setting up your environment, a student embarking on a coding journey, or simply need to run a specific application that relies on the Java Runtime Environment (JRE).

This guide aims to demystify the process, offering a professional, insightful, and engaging walkthrough for installing Java on your macOS system. We’ll cover everything from understanding different Java distributions to step-by-step installation methods, verification, and essential configuration, ensuring you have a robust and functional Java setup.
Understanding Java on macOS: Why It Matters
Before diving into the installation process, it’s beneficial to grasp what Java entails and why its presence on your macOS system is significant. This foundational understanding will help you make informed decisions about which version and distribution to choose.
What is Java and its Ecosystem?
Java isn’t just a programming language; it’s a complete platform comprising several key components:
-
Java Development Kit (JDK): This is the core package for Java developers. It includes everything needed to write, compile, debug, and run Java applications. Crucially, it contains the Java Runtime Environment (JRE) and the Java Virtual Machine (JVM), along with development tools like the Java compiler (
javac), debugger (jdb), and archiver (jar). If you plan to write or compile Java code, you need the JDK. -
Java Runtime Environment (JRE): The JRE is what you need to simply run Java applications. It consists of the JVM and the core class libraries. Historically, users often installed only the JRE if they didn’t develop in Java, but modern distributions often bundle the JRE within the JDK, making the JDK the de facto standard installation for most.
-
Java Virtual Machine (JVM): The JVM is the engine that executes Java bytecode. It’s the “anywhere” part of “write once, run anywhere,” abstracting the underlying operating system and hardware details.
The Importance of Java for macOS Users
For macOS users, Java serves multiple purposes:
-
Application Compatibility: Many critical applications, especially in scientific, educational, and enterprise sectors, are built on Java. Installing Java ensures these applications can run seamlessly on your Mac.
-
Development Environment: For software developers, Java is indispensable. It’s required for building Android apps (via Android Studio), developing backend services (Spring Boot, Jakarta EE), creating desktop applications (Swing, JavaFX), and much more.
-
Tooling: Numerous developer tools, IDEs (like IntelliJ IDEA, Eclipse), and build automation tools (Maven, Gradle) are themselves Java-based or require a Java installation to function correctly.
Choosing the Right Java Version and Distribution
One of the most common points of confusion for newcomers is deciding which Java version and distribution to install.
-
JDK vs. JRE: As discussed, developers need the JDK. If you only need to run applications, the JRE is technically sufficient, but installing a full JDK is generally recommended as it covers all bases and modern JDKs are optimized for size.
-
OpenJDK vs. Oracle JDK:
-
Oracle JDK: Historically the dominant distribution, Oracle JDK requires a commercial license for production use if you’re using newer versions (post Java 8). While free for development and personal use, its licensing terms can be complex.
-
OpenJDK: This is the free, open-source reference implementation of Java. It’s maintained by Oracle and the Java community. Most modern distributions (like Adoptium/AdoptOpenJDK, Amazon Corretto, Azul Zulu, Microsoft Build of OpenJDK) are built upon OpenJDK and are completely free for all uses. For most users and developers, OpenJDK-based distributions are the recommended choice due to their open licensing and active community support.
-
-
Java Versions (LTS vs. Short-Term Releases):
-
Long-Term Support (LTS) Versions: These versions receive extended support and updates, making them ideal for production environments and long-term projects. Currently, Java 8, Java 11, Java 17, and Java 21 are LTS releases. It’s generally recommended to stick with an LTS version unless you have a specific need for the latest features of a short-term release.
-
Short-Term Releases: These are released every six months (e.g., Java 18, 19, 20, 22). They introduce new features but have shorter support cycles. Developers might use them to experiment with the latest language enhancements. For a stable environment, an LTS version is preferable.
-
For the purpose of this guide, we will primarily focus on installing an OpenJDK-based LTS version, such as Java 17 or Java 21, due to its widespread adoption and free-to-use nature.
Preparing Your macOS System for Java Installation
A smooth installation process begins with proper preparation. Taking a few moments to set up your system will prevent common headaches and ensure a successful deployment.
Prerequisites Checklist
Before you begin, ensure you have:
-
Administrator Access: You’ll need administrator privileges to install software and modify system-wide environment variables.
-
Stable Internet Connection: To download the Java installer or use package managers, a reliable internet connection is essential.
-
Sufficient Disk Space: While Java itself isn’t massive, ensure you have a few hundred megabytes of free space.
-
Updated macOS: Ensure your macOS is up to date to avoid compatibility issues. Go to System Settings > General > Software Update.
-
Terminal Access: You’ll be using the Terminal application (found in Applications/Utilities) extensively for verification and configuration.
Understanding macOS Security and Permissions
macOS has robust security features like Gatekeeper, which prevents applications from untrusted sources from running. When downloading installers directly, you might encounter warnings. You may need to grant permission in System Settings > Privacy & Security to open applications downloaded from the internet.
Deciding on an Installation Method
There are several ways to install Java on macOS, each with its advantages:
-
Direct Installer (PKG file): Downloading a
.pkginstaller from an OpenJDK provider (like Adoptium) or Oracle is a straightforward, graphical method. -
Homebrew: The popular macOS package manager offers a command-line approach to installing and managing software, including Java. This is highly recommended for developers as it simplifies updates and management.
-
Manual Installation: For advanced users, downloading the
tar.gzarchive and manually placing it in the correct directory offers the most control, though it requires more command-line work.
We will cover the two most common and recommended methods: Direct Installer and Homebrew.
Step-by-Step Installation Methods
Here, we break down the most effective ways to get Java up and running on your Mac. Choose the method that best suits your comfort level and workflow.
Method 1: Installing Java via a Direct Installer (Recommended for Most Users)
This method involves downloading a .pkg file and running it like any other macOS application installer. We’ll use Adoptium (formerly AdoptOpenJDK) as our recommended source for OpenJDK builds.
-
Navigate to Adoptium Website: Open your web browser and go to https://adoptium.net/temurin/releases/.
-
Select Your Java Version:
-
Look for the “LTS Releases” section. It’s highly recommended to choose the latest LTS version (e.g., JDK 21 or JDK 17).
-
Ensure “macOS” is selected as the operating system and “x64” (for Intel Macs) or “aarch64” (for Apple Silicon/M1/M2/M3 Macs) is selected for the architecture. If you’re unsure, most modern Macs are
aarch64. -
Select “JDK” from the package type dropdown.
-
-
Download the Installer: Click the “Latest release” or “Download” button for the desired JDK version’s
.pkgfile. -
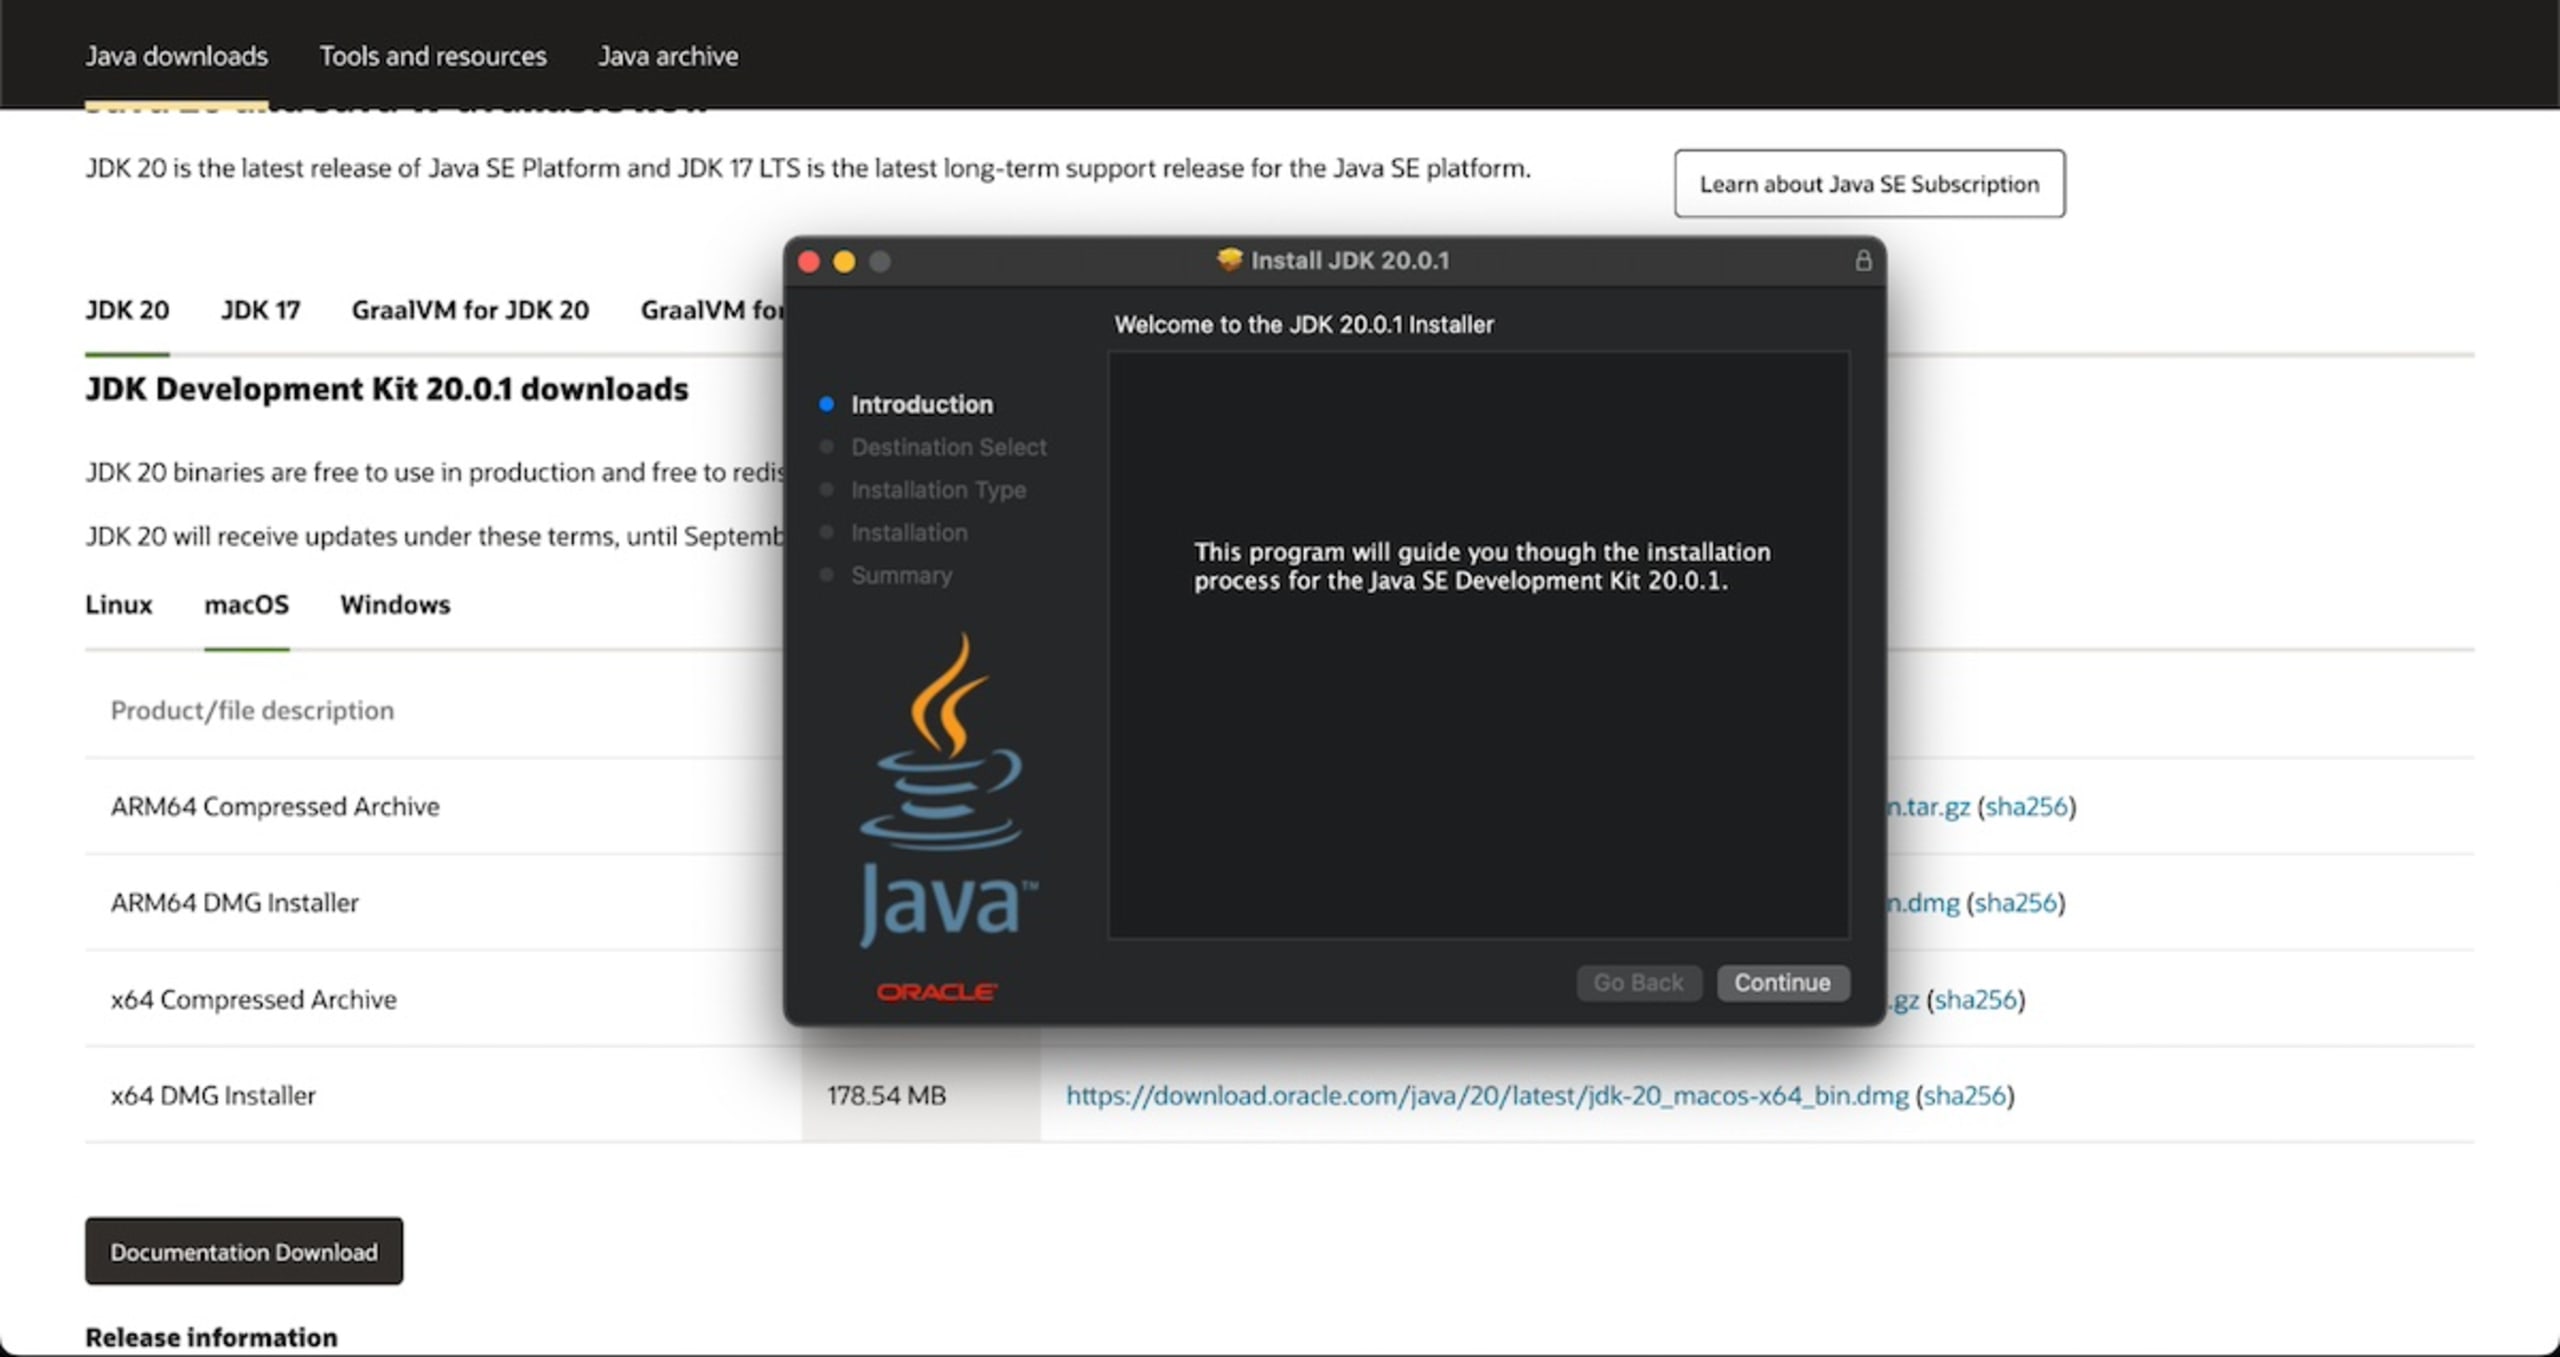
Run the Installer:
-
Once downloaded, locate the
.pkgfile (usually in yourDownloadsfolder). -
Double-click the
.pkgfile to launch the installer. -
Follow the on-screen prompts. Click “Continue,” “Agree” to the license terms, and enter your macOS administrator password when prompted.
-
The installer will place the JDK in
/Library/Java/JavaVirtualMachines/.
-
-
Complete Installation: After the installation finishes, you should see a “The installation was successful” message. You can then move the installer to the Trash.
Method 2: Installing Java with OpenJDK using Homebrew (Recommended for Developers)
Homebrew is a powerful package manager for macOS that simplifies installing and managing command-line tools and software. If you don’t have Homebrew installed, you’ll need to do that first.
-
Install Homebrew (if you haven’t already):
-
Open
Terminal.app(Applications/Utilities). -
Paste the following command and press Enter:
/bin/bash -c "$(curl -fsSL https://raw.githubusercontent.com/Homebrew/install/HEAD/install.sh)" -
Follow the on-screen instructions, which may include entering your administrator password and installing Xcode Command Line Tools.
-
After installation, follow the “Next steps” instructions to add Homebrew to your PATH, typically by running:
echo 'eval "$(/opt/homebrew/bin/brew shellenv)"' >> ~/.zshrc # For zsh

# OR for bash: echo 'eval "$(/usr/local/bin/brew shellenv)"' >> ~/.bash_profile

eval "$(/opt/homebrew/bin/brew shellenv)" # Run this immediately
(Note:
/opt/homebrew/is for Apple Silicon,/usr/local/is for Intel Macs).
-
-
Install Java using Homebrew:
-
In your Terminal, you can install a specific LTS version. For example, to install OpenJDK 21:
brew install openjdk@21 -
Or, for OpenJDK 17:
brew install openjdk@17 -
Homebrew will download and install the JDK to
/usr/local/Cellar/openjdk@version(Intel) or/opt/homebrew/Cellar/openjdk@version(Apple Silicon).
-
-
Link Java to System Paths (Crucial for Homebrew installations):
-
Homebrew typically installs multiple versions in parallel. To make the newly installed version the default, you need to link it. After installation, Homebrew usually provides instructions. Look for lines like:
# For the system to find openjdk@21, symlink it into /usr/local.

sudo ln -sfn /opt/homebrew/opt/openjdk@21/libexec/openjdk.jdk /Library/Java/JavaVirtualMachines/openjdk-21.jdk
(Adjust the path
openjdk-21.jdkto match the version you installed, e.g.,openjdk-17.jdk) -
Run this
sudo ln -sfncommand in your terminal. This creates a symbolic link in the standard macOS Java Virtual Machines directory, making it discoverable by other applications and tools.
-
Verifying Your Java Installation and Configuring Environment Variables
After installation, it’s vital to verify that Java is correctly installed and configured. This often involves checking the version and setting the JAVA_HOME environment variable.
Confirming Installation with Terminal Commands
-
Check Java Runtime Version:
-
Open Terminal and type:
java -version -
You should see output similar to this (depending on your version):
openjdk version "21.0.2" 2024-01-16

OpenJDK Runtime Environment (build 21.0.2+13-LTS)

OpenJDK 64-Bit Server VM (build 21.0.2+13-LTS, mixed mode)
If you get a
command not founderror or an unexpected version, proceed to theJAVA_HOMEsection.
-
-
Check Java Compiler Version (if you installed JDK):
-
Type:
javac -version -
You should see:
javac 21.0.2 -
If
javacis not found, it indicates that yourPATHis not correctly set to include the JDK’sbindirectory, or you only installed a JRE.
-
Setting the JAVA_HOME Environment Variable
The JAVA_HOME environment variable is crucial for many Java-based applications and development tools (like Maven, Gradle, IDEs) to locate your Java installation. macOS doesn’t automatically set this variable after installation.
-
Identify Your Java Installation Path:
-
For Direct Installer (Adoptium/Oracle PKG): The JDK is typically installed in
/Library/Java/JavaVirtualMachines/. You can list the contents to find the exact name:ls -F /Library/Java/JavaVirtualMachines/ # Example output: # adoptopenjdk-17.jdk/ # openjdk-21.jdk/ -
For Homebrew Installation: The JDK is usually in
/opt/homebrew/opt/openjdk@<version>/(Apple Silicon) or/usr/local/opt/openjdk@<version>/(Intel). For example:/opt/homebrew/opt/openjdk@21/
-
-
Edit Your Shell Profile File:
-
macOS Catalina and later use
zshas the default shell. Earlier versions usedbash. You’ll need to edit either~/.zshrcor~/.bash_profile(or~/.profile). -
Open your profile file with a text editor (like
nanoorcodeif you have VS Code):nano ~/.zshrc # For zsh users # OR nano ~/.bash_profile # For bash users
-
-
Add
JAVA_HOMEand UpdatePATH:-
Add the following lines to the end of your profile file. Replace
/path/to/your/jdkwith the actual path you found in step 1.Example for OpenJDK 21 (Homebrew on Apple Silicon):
export JAVA_HOME="/opt/homebrew/opt/openjdk@21/libexec/openjdk.jdk/Contents/Home"

export PATH="$JAVA_HOME/bin:$PATH"
Example for OpenJDK 17 (Direct Installer):
export JAVA_HOME="/Library/Java/JavaVirtualMachines/adoptopenjdk-17.jdk/Contents/Home" export PATH="$JAVA_HOME/bin:$PATH"Self-correction: The
.jdkdirectory often contains aContents/Homesubdirectory. TheJAVA_HOMEshould point to thatHomedirectory, not the.jdkitself, for tools to find thebinandlibdirectories correctly. Homebrew’s symlink (libexec/openjdk.jdk) will point to the root of the JDK, solibexec/openjdk.jdk/Contents/Homeis correct for Homebrew too.Self-correction 2: For Homebrew,
libexec/openjdk.jdkis the symlink created. The actualJAVA_HOMEshould point to$(brew --prefix openjdk@21)/libexec/openjdk.jdk/Contents/Home. Let’s use the explicit path for clarity. For Homebrew, the path will often be/opt/homebrew/opt/openjdk@21. The/Contents/Homepart is crucial.Let’s refine the Homebrew example:
# For Homebrew on Apple Silicon (replace 21 with your version)

export JAVA_HOME="$(/usr/libexec/java_home -v 21)" # A more dynamic way for macOS

# OR if you prefer the explicit Homebrew path:

# export JAVA_HOME="/opt/homebrew/opt/openjdk@21/libexec/openjdk.jdk/Contents/Home"


export PATH="$JAVA_HOME/bin:$PATH"
The
/usr/libexec/java_homeutility is excellent for macOS as it dynamically finds the best JDK installed.
-
-
Save and Exit:
- If using
nano, pressCtrl+X, thenYto confirm saving, andEnter.
- If using
-
Source Your Profile File:
-
For the changes to take effect in your current Terminal session, you need to “source” the file:
source ~/.zshrc  # For zsh users

# OR

source ~/.bash_profile # For bash users
-
-
Verify
JAVA_HOME:-
Type
echo $JAVA_HOMEandecho $PATH. You should see the path to your Java installation and itsbindirectory included in thePATH. -
Run
java -versionandjavac -versionagain to ensure they now point to the correct version.
-
Managing Multiple Java Versions
Developers often need to switch between different Java versions for various projects.
-
jEnv: A popular tool for managing multiple JDK installations. It allows you to set global, local (per-project), or shell-specific Java versions easily. Installation is typically via Homebrew (brew install jenv). -
macOS
java_homeutility: The command/usr/libexec/java_home -Vlists all installed JDKs and their paths. You can manually switch by updatingJAVA_HOMEin your shell profile to point to a different version’s path and thensourcethe file.
Common Issues and Troubleshooting
Even with clear instructions, issues can arise. Here are solutions to common problems.
“Java command not found” Errors
-
Cause: This almost always means Java is not in your shell’s
PATHenvironment variable, orJAVA_HOMEis not set correctly. -
Solution:
-
Revisit
JAVA_HOMEandPATH: Double-check theJAVA_HOMEexport in your~/.zshrcor~/.bash_profile. Ensure the path is correct and points to theContents/Homedirectory within your JDK. -
Source the Profile: Make sure you ran
source ~/.zshrc(or.bash_profile) after making changes. -
Check for Typos: Even a single typo can prevent Java from being found.
-
Confirm JDK Installation: Ensure the JDK was actually installed to the expected directory.
-
Permission Problems During Installation
-
Cause: macOS security features sometimes block installers or require explicit permission.
-
Solution:
-
Grant Permissions: If prompted by Gatekeeper, go to System Settings > Privacy & Security and look for a message about the blocked installer. Click “Open Anyway.”
-
Use
sudo: For Homebrew linking commands,sudois often required to create symlinks in system directories.
-
Verifying the Correct Version is Being Used
-
Cause: You might have multiple Java versions installed, and the wrong one is being picked up.
-
Solution:
-
Check
java -versionandjavac -version: These commands will show you the version currently being used by your shell. -
Inspect
echo $PATH: Look at the order of directories in yourPATH. The first directory containingjavaorjavacwill be used. Ensure your desired$JAVA_HOME/binis at the beginning of thePATHvariable. -
Use
/usr/libexec/java_home: Run/usr/libexec/java_home -Vto see all known JDKs. Then, you can explicitly set yourJAVA_HOMEbased on this output.
-
Updating and Uninstalling Java
-
Updating:
-
Direct Installer: Download and run the new
.pkginstaller for the desired version. It will typically install side-by-side or overwrite existing files, depending on the version. You may need to update yourJAVA_HOMEif you want to switch to the newer version. -
Homebrew: Use
brew upgrade openjdk@<version>to update a specific version, orbrew upgradeto upgrade all installed packages. To install a new major version,brew install openjdk@<new_version>.
-
-
Uninstalling:
-
Direct Installer: Manually delete the JDK directory from
/Library/Java/JavaVirtualMachines/. For example:sudo rm -rf /Library/Java/JavaVirtualMachines/openjdk-21.jdk -
Homebrew: Use
brew uninstall openjdk@<version>. For example:brew uninstall openjdk@21 -
After uninstalling, remember to remove any
JAVA_HOMEorPATHentries related to that version from your shell profile.
-

Empowering Your macOS with Java
Installing Java on macOS is a fundamental step for anyone looking to leverage its vast ecosystem. Whether you chose the straightforward .pkg installer or the more developer-centric Homebrew, you now have a powerful and versatile platform at your fingertips. By understanding the different Java components, distributions, and versions, and by meticulously following the installation and verification steps, you’ve equipped your Mac to handle a myriad of Java-based applications and development tasks.
With Java successfully installed and configured, you’re ready to compile your first Java program, run existing applications, or dive into complex development frameworks. Embrace the power of Java, and unlock new possibilities on your macOS machine.
aViewFromTheCave is a participant in the Amazon Services LLC Associates Program, an affiliate advertising program designed to provide a means for sites to earn advertising fees by advertising and linking to Amazon.com. Amazon, the Amazon logo, AmazonSupply, and the AmazonSupply logo are trademarks of Amazon.com, Inc. or its affiliates. As an Amazon Associate we earn affiliate commissions from qualifying purchases.