
Maintaining the climate control systems within your home or office is a critical component of property management. When an air conditioning unit stops blowing cold air, it is often a sign of a refrigerant leak or depletion. While many view this as a simple DIY project, understanding the complexities of HVAC systems is essential for safety, environmental compliance, and long-term equipment performance. This guide outlines the technical requirements, safety protocols, and systematic process involved in managing refrigerant levels in modern air conditioning units.
Understanding HVAC Refrigerant Systems and Safety Protocols
Before attempting any maintenance on an AC unit, it is imperative to understand the technology at play. Air conditioning systems operate on a closed-loop cycle. Under normal operating conditions, refrigerant is not “consumed” like gasoline in a car. If the system is low on refrigerant, it almost certainly indicates that a leak has occurred. Adding more refrigerant without repairing the leak is a temporary fix that results in continued environmental damage and potential compressor failure.

Professional Certification and Regulatory Compliance
In many jurisdictions, the handling of refrigerants—specifically chlorofluorocarbons (CFCs), hydrochlorofluorocarbons (HCFCs), and hydrofluorocarbons (HFCs)—is strictly regulated. For example, in the United States, the Environmental Protection Agency (EPA) requires technicians to be certified under Section 608 of the Clean Air Act to purchase and handle refrigerant. These regulations exist because refrigerants are potent greenhouse gases that can cause significant atmospheric damage if vented improperly. Always verify your local regulations before acquiring or attempting to use refrigerant canisters.
Personal Protective Equipment (PPE)
Refrigerant is a hazardous chemical. When exposed to the atmosphere, liquid refrigerant boils rapidly, which can cause severe frostbite upon contact with skin. Furthermore, if a leak occurs in a confined space, the gas can displace oxygen, leading to asphyxiation. Always wear chemical-resistant gloves, safety goggles, and long sleeves. Ensure the workspace is well-ventilated, and avoid any contact with open flames or high-heat sources, as some refrigerants can decompose into toxic gases when exposed to extreme heat.
Diagnosing System Pressure and Leak Detection
Before you can add refrigerant, you must accurately diagnose the state of the system using a manifold gauge set. These gauges allow you to monitor both the “high side” (discharge) and “low side” (suction) pressures of the AC unit.
Interpreting Gauge Readings
A properly functioning system should have specific pressure readings depending on the outdoor ambient temperature and the type of refrigerant being used (e.g., R-22, R-410A). If the low-side pressure is significantly lower than the manufacturer’s specification, the unit is starved of refrigerant. However, before proceeding to add fluid, you must identify the source of the leak. Common culprits include:
- Service Valve Caps: Often, slow leaks occur because caps were not tightened properly, allowing slow seepage of gas.
- Corroded Evaporator Coils: These are often found inside the air handler and are frequent points of failure due to the constant condensation cycles they endure.
- Flare or Solder Connections: Vibration from the compressor can cause tiny cracks in the copper piping connections over time.
The Importance of Leak Testing
Using an electronic leak detector or a soapy water solution, systematically check all joints, valves, and coils. If a leak is detected, it must be sealed or the faulty component replaced before recharging the system. Simply “topping off” a system with a slow leak is economically inefficient and environmentally irresponsible.
The Technical Process of Recharging Refrigerant
Once you have confirmed that the leak has been addressed and the system is ready for service, you can begin the process of adding refrigerant. This process requires precision, as overcharging a system is just as detrimental as undercharging it.
Connecting the Manifold Gauges
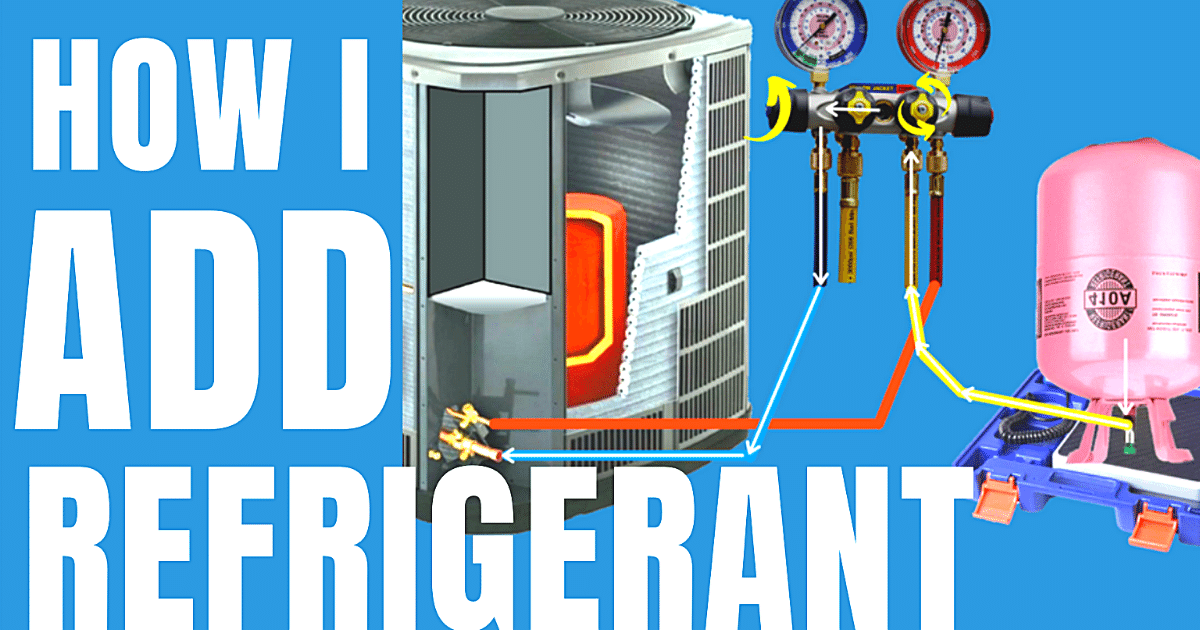
Ensure the unit is powered off before connecting your hoses. Connect the blue hose (low side) to the suction service port and the red hose (high side) to the discharge service port. The yellow hose will connect to your refrigerant canister. Once connected, purge the air from the lines; if air enters the sealed system, it will lead to moisture buildup, which can freeze and cause permanent damage to the compressor’s internal components.
Charging by Weight vs. Pressure
The most accurate method for charging an air conditioning unit is by weight. Most nameplates on AC units specify the exact mass of refrigerant required for the system. Using an accurate digital scale, place the refrigerant canister on the scale and record the initial weight.
- Open the valve on the refrigerant canister.
- Slowly introduce the refrigerant into the system, monitoring the scale.
- Once the target weight has been achieved, close the canister valve immediately.
- Monitor the gauges to ensure that the pressures have stabilized within the manufacturer’s designated operating range.
If you do not have a scale, you must charge based on “superheat” and “subcooling” calculations. This involves measuring the temperature of the refrigerant lines and comparing them to the saturation temperatures indicated by the gauges. This is a highly technical skill that requires a thorough understanding of thermodynamic properties.
Post-Maintenance Verification and System Optimization
After the refrigerant has been added and the service ports are closed, it is vital to perform a system checkout to ensure optimal efficiency. This is where the difference between a amateur repair and a professional service becomes apparent.
Checking Airflow and Temperature Differential
Verify that the return air and supply air temperatures are within the appropriate range (typically a 15–20 degree Fahrenheit difference). If the unit is drawing the correct amount of current (Amperage) at the compressor, you can be confident that the system is operating within its design parameters. Check the amperage using a clamp meter; if the compressor is pulling too many amps, it may be a sign that the system is overcharged or that the capacitor is failing.
Environmental Cleanup and Reporting
Ensure that all service caps are replaced, as these are a secondary seal that prevents refrigerant migration. If you utilized a leak-stopping agent, note this in the unit’s maintenance log. Keeping detailed records of maintenance is essential for the long-term longevity of the HVAC system. If you find that the system continues to lose pressure despite your efforts, it is a clear indicator that the leak is located in an inaccessible area of the coils, and a full system replacement may be more cost-effective than continued repairs.
When to Call a Professional
While this guide details the technical requirements for handling refrigerant, it is important to recognize the limitations of DIY maintenance. Refrigerant-based cooling is a complex mechanical process. If you find that the unit is not responding correctly to the charging process, or if the system uses modern, high-pressure refrigerants that require specialized equipment, do not hesitate to contact a certified HVAC technician. They possess the recovery machines necessary to safely reclaim used refrigerant, preventing illegal venting and ensuring your home’s climate control remains efficient, safe, and environmentally compliant.
aViewFromTheCave is a participant in the Amazon Services LLC Associates Program, an affiliate advertising program designed to provide a means for sites to earn advertising fees by advertising and linking to Amazon.com. Amazon, the Amazon logo, AmazonSupply, and the AmazonSupply logo are trademarks of Amazon.com, Inc. or its affiliates. As an Amazon Associate we earn affiliate commissions from qualifying purchases.