
Salesforce, the world’s leading cloud-based CRM, is a dynamic platform that thrives on data. From customer records to sales opportunities, every piece of information contributes to business intelligence and operational efficiency. However, managing this data, especially in bulk, can be a complex task. This is where Salesforce Data Loader emerges as an indispensable tool. Designed for both administrators and developers, Data Loader facilitates the mass import, export, update, and deletion of records within your Salesforce organization, bridging the gap between external data sources and your CRM.
Understanding how to effectively install and utilize Data Loader is not just about technical proficiency; it’s about unlocking a higher level of data management capability. This tool empowers users to perform operations that would be cumbersome or even impossible through the standard Salesforce user interface, such as migrating large datasets, updating thousands of records simultaneously, or backing up critical information. Without it, the agility and scalability offered by Salesforce could be severely limited when dealing with significant data volumes.
This comprehensive guide will walk you through the entire process of installing Salesforce Data Loader, from understanding its core functionalities and checking prerequisites to a detailed, step-by-step installation on various operating systems. We will also delve into initial configuration, basic data operations, and essential best practices to ensure your data management activities are efficient, secure, and error-free. By the end of this article, you will be equipped with the knowledge to harness the full power of Data Loader, transforming your approach to Salesforce data management.
Understanding Salesforce Data Loader: The Data Management Powerhouse
Salesforce Data Loader is a powerful client application that enables you to perform bulk operations on Salesforce records. Unlike the browser-based Import Wizards, Data Loader is designed for handling larger volumes of data and offers more sophisticated functionalities, making it a critical tool for any Salesforce professional.
The Power of Bulk Data Operations
At its core, Data Loader provides a streamlined way to interact with Salesforce data in large quantities. Its capabilities extend far beyond simple record creation. Here’s a quick overview of the key operations it supports:
-
Insert: Adding new records to Salesforce (e.g., importing a new list of leads).
-
Update: Modifying existing records based on their unique IDs (e.g., updating contact information for a segment of customers).
-
Upsert: A combination of insert and update. It updates existing records if they match a specified external ID, otherwise, it inserts them as new records (e.g., synchronizing data from an external system).
-
Delete: Permanently removing records from Salesforce (e.g., purging old or duplicate data). This operation typically moves records to the Recycle Bin first, allowing for recovery.
-
Hard Delete: Permanently deleting records directly, bypassing the Recycle Bin. This operation is irreversible and requires special permissions.
-
Export: Extracting Salesforce data into a CSV file (e.g., backing up critical account information).
-
Export All: Similar to Export, but includes records in the Recycle Bin.
These operations are crucial for various administrative tasks, data migration projects, and ongoing data maintenance. For instance, when merging two Salesforce instances, migrating data from a legacy system, or performing regular data cleansing, Data Loader becomes an indispensable asset.
When to Use Data Loader vs. Other Tools
While Salesforce offers several tools for data manipulation, understanding when to leverage Data Loader is key to efficient administration.
-
Salesforce Import Wizards: These are web-based tools suitable for smaller data volumes (typically up to 50,000 records) and specific standard objects (e.g., Accounts, Contacts, Leads, Solutions). They are user-friendly but lack the flexibility and advanced features of Data Loader. Use them for quick, simple imports.
-
Salesforce Data Loader: Ideal for larger data volumes (up to 5 million records per operation), custom objects, and complex scenarios requiring Upsert, Delete, or Hard Delete operations. It also supports all standard objects and provides greater control over field mapping and error handling. It’s the go-to for serious bulk data management.
-
Third-Party Data Integration Tools: For highly complex, automated, or real-time data synchronization needs, external integration platforms (ETL tools) might be necessary. These tools offer advanced scheduling, data transformation, and connectivity options beyond Data Loader’s scope. Data Loader serves as a powerful standalone utility for one-off or scheduled batch operations.
In essence, Data Loader fills a critical niche, offering a robust, free, and accessible solution for significant data management challenges within Salesforce without requiring a full-blown enterprise integration solution.
Prerequisites for Installation and Operation
Before you embark on installing Data Loader, it’s crucial to ensure your system and Salesforce environment meet the necessary requirements. Overlooking these prerequisites can lead to installation failures or operational issues down the line.
System Requirements and Java Runtime Environment
Salesforce Data Loader is a desktop application, meaning it runs locally on your computer. Therefore, your operating system must be compatible, and the necessary software components must be installed.
-
Operating System: Data Loader is supported on Windows (Windows 10, 11) and macOS (macOS 10.15 Catalina or later). Ensure your operating system is up-to-date for optimal compatibility and security.
-
Java Runtime Environment (JRE): Data Loader is a Java-based application. Therefore, a compatible Java Runtime Environment must be installed on your system. Salesforce typically recommends specific versions, usually OpenJDK 11 or later. If you don’t have Java installed or have an older version, you’ll need to install or update it before proceeding with Data Loader installation. You can download OpenJDK from various providers like AdoptOpenJDK, Amazon Corretto, or Oracle.
Salesforce User Permissions and Security Considerations
Beyond your local system, your Salesforce user account also needs specific permissions to download and use Data Loader effectively.
-
“Download Data Loader” Permission: This permission is essential for accessing the Data Loader installation files from Salesforce. It is typically granted through a profile or permission set.
-
“API Enabled” Permission: Data Loader communicates with Salesforce via its API. Thus, the Salesforce profile or permission set associated with the user account you’ll use for Data Loader operations must have the “API Enabled” permission. Without this, Data Loader cannot connect to your Salesforce organization.
-
“Modify All Data” or Specific Object Permissions: The specific data operations you intend to perform (Insert, Update, Delete, Export) require corresponding object-level permissions. For instance, to insert new accounts, your user needs “Create” permission on the Account object. For mass modifications across various objects, a user with “Modify All Data” is often used, but it’s best practice to use a dedicated integration user with the least privilege necessary.
-
Connected App (for newer Data Loader versions): For enhanced security and control, newer versions of Data Loader leverage Salesforce Connected Apps. When you first log in with Data Loader, Salesforce may prompt you to allow access to the Connected App. Administrators can configure IP ranges, refresh token policies, and other security settings for this Connected App, ensuring secure communication between Data Loader and your Salesforce instance.
By carefully reviewing and meeting these prerequisites, you lay a solid foundation for a smooth Data Loader installation and a secure, efficient data management experience.
Step-by-Step Installation Guide
With the prerequisites in place, you’re ready to proceed with the actual installation of Salesforce Data Loader. The process is straightforward, but it varies slightly depending on your operating system.
Downloading Data Loader
The Data Loader application is downloaded directly from your Salesforce organization.
-
Log in to Salesforce: Access your Salesforce org as an administrator or a user with the “Download Data Loader” permission.
-
Navigate to Data Loader Settings:
-
In Salesforce Classic: Go to
Setup > Data Management > Data Loader. -
In Lightning Experience: Click the gear icon (Setup) >
Setup Home > Integrations > Data Loader.
-
-
Select Your Operating System: On the Data Loader page, you will find download links for both Windows and macOS. Click the appropriate link for your operating system to download the installation file (e.g.,
install_dataloader_xx.exefor Windows,install_dataloader_xx.dmgfor macOS). -
Save the File: Save the installer file to a location on your computer where you can easily find it.
Installation on Windows
-
Run the Installer: Locate the downloaded
install_dataloader_xx.exefile and double-click it to launch the installer. -
Security Warning (if any): If prompted by Windows Defender SmartScreen or User Account Control, click “Run anyway” or “Yes” to allow the installer to run.
-
Setup Wizard: The Salesforce Data Loader Setup Wizard will appear. Click “Next” to begin.
-
License Agreement: Read the license agreement carefully. If you agree, select “I accept the agreement” and click “Next.”
-
Choose Installation Location: The installer will suggest a default installation directory (e.g.,
C:Program FilesSalesforceorC:Program Files (x86)Salesforce). You can change this if desired, then click “Next.” -
Create Desktop Shortcut (Optional): You’ll be given the option to create a desktop shortcut. Select this if you want quick access, then click “Next.”
-
Ready to Install: Review your settings and click “Install.” The installer will copy the necessary files to your system.
-
Installation Complete: Once the installation is finished, click “Finish.” Data Loader is now installed on your Windows machine.
Installation on macOS
-
Open the DMG File: Locate the downloaded
install_dataloader_xx.dmgfile and double-click it. This will mount the disk image and open a new Finder window. -
Drag to Applications: In the Finder window, you will typically see the Salesforce Data Loader application icon and an “Applications” folder alias. Drag the Salesforce Data Loader application icon into the “Applications” folder.
-
Eject the Disk Image: After copying, you can eject the Salesforce Data Loader disk image from your Finder sidebar or desktop.
-
First Launch & Security Prompt:
-
Navigate to your Applications folder and locate “Salesforce Data Loader.”
-
Crucially for macOS: The first time you open Data Loader, you might encounter a security warning stating that the app “cannot be opened because the developer cannot be verified.”
-
To bypass this, right-click (or Control-click) on the “Salesforce Data Loader” application icon, then select “Open.” You will see a similar warning, but this time it will include an “Open” button. Click “Open.” This action registers Data Loader as an exception in your macOS security settings. Subsequent launches will not require this workaround.
-
Verifying Installation
To ensure Data Loader is correctly installed, launch the application.

-
Windows: Find “Data Loader” in your Start Menu or double-click the desktop shortcut if you created one.
-
macOS: Navigate to your Applications folder and double-click “Salesforce Data Loader.”
If the Data Loader login window appears, your installation was successful.
Configuring and First Use of Data Loader
Once installed, the next step is to configure Data Loader and perform your first data operation. This involves logging in, understanding the user interface, and executing a basic task like exporting data.
Logging In: Salesforce Login vs. Custom Domain
Data Loader offers two primary methods for logging into your Salesforce organization:
-
Salesforce Login (Standard): This is the most common method.
-
Select “Salesforce Login” in the Data Loader login window.
-
Enter your Salesforce username and password.
-
Important: If your Salesforce organization has configured “My Domain” or uses multi-factor authentication (MFA), you might need to append a security token to your password. To get your security token:
-
In Salesforce, go to
Settings > Personal Information > Reset My Security Token. -
Click “Reset Security Token” and Salesforce will email it to you.
-
When logging into Data Loader, your password will be
[YourSalesforcePassword][YourSecurityToken].
-
-
-
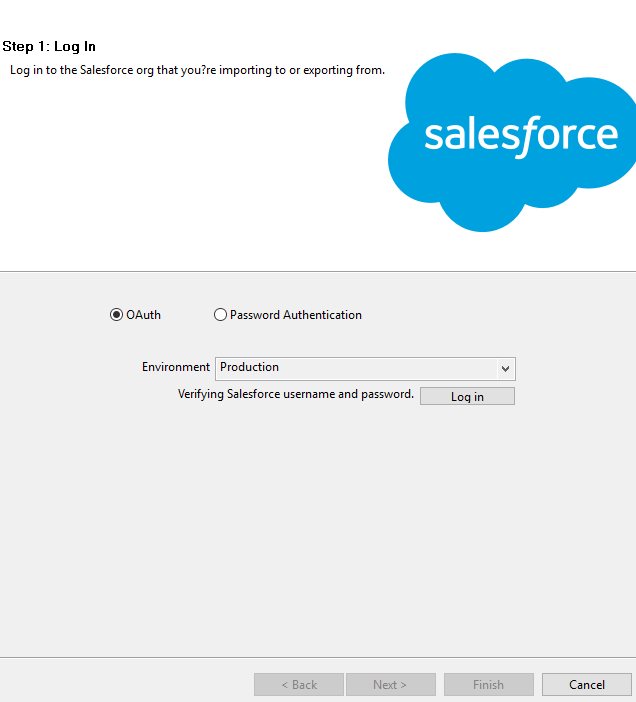
OAuth (for Custom Domains or Enhanced Security): If your organization uses a custom domain or you prefer a more secure, token-based authentication, you can use OAuth.
-
Select “OAuth” in the Data Loader login window.
-
Click “Login.”
-
A browser window will open, prompting you to log in to your Salesforce organization via your custom domain.
-
After successful login and potentially approving access to the Connected App, the browser will close, and Data Loader will authenticate. This method is often simpler as it doesn’t require appending a security token.
-
Interface Overview and Basic Data Operations
The Data Loader interface is intuitive and designed for efficiency. After logging in, you’ll see a series of buttons representing the main operations: Insert, Update, Upsert, Delete, Hard Delete, Export, and Export All.
Let’s walk through a simple Export operation as your first use:
-
Click “Export”: Select this button to extract data.
-
Choose Object: A list of all standard and custom Salesforce objects will appear. Select the object you wish to export (e.g., “Account”).
-
Choose Target for Extraction: Specify the path and filename for your output CSV file (e.g.,
C:UsersYourUserDesktopAccounts_Export.csv). Click “Next.” -
Select Fields: You’ll see a list of available fields for the chosen object. Select the fields you want to include in your export. You can drag and drop fields to reorder them.
-
Add Conditions (Optional): If you want to filter your data (e.g., only export accounts created after a specific date), you can add WHERE clauses. For a full export, leave this blank.
-
Click “Finish”: Data Loader will process the export. You’ll see a confirmation message indicating the number of records exported and any errors encountered.
-
View Extraction: Open the specified CSV file to view your exported data.
The process for Insert, Update, Upsert, and Delete is similar, but instead of selecting fields, you will be mapping columns from your input CSV file to Salesforce fields.
Field Mapping Essentials
Field mapping is a critical step in all Data Loader import/update operations.
-
CSV Headers to Salesforce Fields: When you perform an Insert, Update, Upsert, or Delete, Data Loader will ask you to select your input CSV file. After that, it will display a “Mapping” window.
-
Auto-Matching: Data Loader attempts to automatically map CSV column headers to Salesforce field API names if they match exactly.
-
Manual Mapping: For unmatched fields, you’ll need to manually drag and drop Salesforce fields from the top panel to their corresponding CSV column headers in the bottom panel.
-
Saving Maps: For repetitive operations, you can save your field mappings, which can be loaded for future tasks, saving time and reducing errors.
Mastering field mapping is essential for accurate data operations. Take your time to ensure every field is correctly aligned to prevent data corruption or incorrect imports.
Best Practices and Troubleshooting Tips
While Data Loader is a robust tool, working with large datasets always carries a degree of risk. Adopting best practices and knowing how to troubleshoot common issues will significantly enhance your data management success.
Data Preparation and Validation
The quality of your input data directly impacts the success of your Data Loader operations.
-
Clean and Standardize: Before any import, ensure your CSV data is clean, consistent, and standardized. Remove duplicates, correct typos, and standardize picklist values.
-
Required Fields: Verify that all required fields for the target Salesforce object are present and populated in your CSV.
-
Data Types: Ensure that data types in your CSV match Salesforce’s expected types (e.g., numbers for number fields, dates for date fields).
-
External IDs: When performing Upsert operations, ensure your CSV includes an “External ID” column and that the values are unique and correctly mapped to a designated External ID field in Salesforce.
-
Small Batches for Testing: For large imports, always test with a small batch of records (e.g., 5-10 records) first to catch any mapping or data issues before processing the entire dataset.
Backup Before Bulk Operations
This is arguably the most crucial best practice.
-
Export Existing Data: Before performing any Update, Upsert, or Delete operation, always export the existing data that will be affected. This provides a rollback point if anything goes wrong. For example, if you’re updating Contact records, export all Contact records (or at least those you intend to update) before running the update. This way, if the update introduces errors, you can use the backup to revert the changes.
-
Use the Recycle Bin: Remember that standard Delete operations send records to the Recycle Bin. This provides a safety net for 15 days. Hard Delete, however, bypasses the Recycle Bin and should be used with extreme caution and only after a thorough backup.
Common Errors and Solutions
Even with careful preparation, errors can occur. Data Loader provides error files to help diagnose issues.
-
success.csvanderror.csv: After every operation, Data Loader generates two CSV files. Thesuccess.csvshows records that were processed correctly. Theerror.csvlists records that failed, along with a Salesforce error message. -
Common Error Types:
-
“Required fields missing”: A mandatory field in Salesforce was not provided in your CSV.
-
“Invalid ID”: Often occurs in Update/Upsert/Delete operations where the Salesforce ID (or External ID) in your CSV does not match an existing record.
-
“Picklist value is not valid”: The value provided in your CSV for a picklist field does not exist in Salesforce’s defined picklist values.
-
“Duplicate value found”: You’re trying to insert a record with a value in a unique field that already exists.
-
“Insufficient access rights”: The Salesforce user account used for Data Loader lacks the necessary permissions for the object or operation.
-
-
Troubleshooting Steps:
-
Review the
error.csvcarefully. The error messages are often descriptive. -
Check your input CSV for data quality, mapping errors, or missing required fields.
-
Verify the Salesforce user’s permissions.
-
If dealing with lookup fields, ensure you’re providing the correct Salesforce ID or a unique External ID for the related record.
-
Performance Tips for Large Datasets
When dealing with millions of records, optimizing Data Loader performance is crucial.
-
Batch Size: Data Loader processes records in batches. You can adjust the batch size in Data Loader settings (
Settings > Settings). Smaller batch sizes (e.g., 200-500) can reduce “lock contention” errors during updates but increase overall processing time. Larger batches (e.g., 2,000-10,000) are faster but might be more prone to contention errors in highly active orgs. Experiment to find the optimal size for your org. -
Disable Automation (Temporarily): For massive data loads, consider temporarily deactivating workflows, process builders, flows, validation rules, or Apex triggers on the affected objects. This can drastically improve performance. Always re-enable them immediately after the operation and test thoroughly.
-
Use Standard vs. Bulk API: Data Loader offers two API options:
-
Standard API: Processes records one by one or in smaller batches. Good for fewer records and when preserving triggers/automation is critical.
-
Bulk API: Designed for large volumes of data. It processes records asynchronously in parallel and is generally faster for mass operations. It also automatically handles retries. You can enable it in Data Loader settings (
Settings > Settings > Use Bulk API).
-
By diligently applying these best practices and understanding common pitfalls, you can ensure your Data Loader operations are not only successful but also contribute to a healthy and well-managed Salesforce environment.
Conclusion
Salesforce Data Loader is an indispensable utility for anyone managing data within the Salesforce ecosystem. From initial setup to advanced data operations, mastering this tool empowers administrators and developers to handle vast amounts of information with precision and efficiency. We’ve journeyed through its core functionalities, outlined essential prerequisites, provided a detailed installation guide for both Windows and macOS, and explored the nuances of configuration and first use. Furthermore, we’ve emphasized crucial best practices—such as rigorous data preparation, the imperative of backing up data, and systematic troubleshooting—to mitigate risks and ensure data integrity.
The ability to perform bulk inserts, updates, upserts, and deletes, along with comprehensive data exports, fundamentally transforms how organizations interact with their Salesforce data. It eliminates manual, time-consuming processes, reduces human error, and facilitates critical tasks like data migration, system integration, and regular data maintenance. By investing the time to understand and correctly implement Data Loader, you are not just installing another piece of software; you are acquiring a powerful capability that will enhance your productivity, bolster data quality, and ultimately drive greater value from your Salesforce investment.
Embrace Data Loader as a cornerstone of your Salesforce administration toolkit. With the knowledge gained from this guide, you are now well-prepared to tackle even the most challenging data management scenarios, ensuring your Salesforce data remains accurate, accessible, and aligned with your business objectives.
aViewFromTheCave is a participant in the Amazon Services LLC Associates Program, an affiliate advertising program designed to provide a means for sites to earn advertising fees by advertising and linking to Amazon.com. Amazon, the Amazon logo, AmazonSupply, and the AmazonSupply logo are trademarks of Amazon.com, Inc. or its affiliates. As an Amazon Associate we earn affiliate commissions from qualifying purchases.