
Adobe Illustrator is an indispensable tool for vector graphics, empowering designers to create scalable artwork with precision and artistic flair. While its core features offer immense versatility, the true power of Illustrator often lies in its expandability – particularly through custom brushes. Brushes can dramatically transform the aesthetic of your lines, strokes, and shapes, adding texture, complexity, and unique artistic styles that would be cumbersome or impossible to achieve with standard tools alone. Whether you’re aiming for a hand-drawn look, intricate patterns, or precise technical lines, knowing how to efficiently install and manage brushes is a fundamental skill for any Illustrator user. This comprehensive guide will walk you through the essential methods for integrating new brushes into your workflow, ensuring you can unlock a new level of creativity and efficiency in your design projects.
Understanding Illustrator Brushes and Their Value
Before diving into the installation process, it’s crucial to grasp what Illustrator brushes are, why they are so valuable, and where you can acquire them. This foundational knowledge will help you make informed decisions and optimize your brush collection.
What are Brushes in Illustrator?
In Adobe Illustrator, brushes are not merely predefined line styles; they are dynamic tools that apply a specific appearance to a path. Unlike raster brushes found in programs like Photoshop, Illustrator brushes are vector-based. This means they remain perfectly scalable and editable without losing quality, a core advantage of vector graphics. There are several types of brushes in Illustrator, each serving a unique purpose:
-
Calligraphic Brushes: Mimic the strokes of traditional calligraphic pens, offering variable width and angle.
-
Art Brushes: Stretch an artwork shape along the path. These are excellent for creating consistent patterns, decorative elements, or complex textures that follow a line.
-
Pattern Brushes: Repeat a pattern (made of multiple tiles for corners, ends, and side segments) along a path, ideal for borders, frames, and intricate decorative elements.
-
Scatter Brushes: Disperse copies of an object (or multiple objects) along a path, allowing for randomness in size, spacing, rotation, and scatter. Great for creating natural textures like grass, confetti, or scattered elements.
-
Bristle Brushes: Simulate the look and feel of natural paintbrushes, offering realistic brushstrokes with texture and translucency. These are particularly useful for digital painting within Illustrator.
Each brush type opens up a different avenue for creative expression, making them incredibly valuable assets for designers across various disciplines.
Why Use Custom Brushes?
The standard set of brushes that come with Illustrator is a good starting point, but custom brushes unlock a world of possibilities that extend far beyond default offerings. Here’s why incorporating custom brushes is a game-changer:
-
Enhanced Creativity and Style: Custom brushes allow you to achieve unique visual styles that differentiate your work. You can mimic traditional media like charcoal, watercolor, or ink, or invent entirely new digital aesthetics.
-
Time-Saving Efficiency: Instead of manually drawing intricate patterns or textures, a custom brush can apply these complex designs with a single stroke, drastically reducing production time. For repetitive elements, they are invaluable.
-
Consistency Across Projects: By using a curated set of custom brushes, you can maintain a consistent visual language across different projects or within a brand’s guidelines, ensuring a cohesive design aesthetic.
-
Specialized Effects: Many custom brushes are designed for specific effects, such as halftone patterns, stitching, distressed textures, or architectural elements, providing specialized tools for niche design requirements.
-
Community and Collaboration: The design community frequently shares and sells high-quality brush sets, allowing designers to benefit from the expertise and creativity of others. This fosters collaboration and access to diverse design resources.
Ultimately, custom brushes are an investment in your design toolkit, empowering you to work more efficiently, creatively, and uniquely.
Sourcing High-Quality Brushes
Before you can install brushes, you need to acquire them. The good news is there’s a vast ecosystem of resources for high-quality Illustrator brushes:
-
Adobe Stock & Creative Cloud Libraries: Adobe offers a wealth of brushes through its Creative Cloud ecosystem, including premium sets on Adobe Stock. These often integrate seamlessly into your Illustrator environment.
-
Third-Party Marketplaces: Websites like Envato Elements, Creative Market, Design Cuts, and Gumroad host thousands of custom brush packs, often bundled with other design assets. These platforms feature brushes created by independent designers.
-
Free Resources: Many designers generously offer free brush sets on their blogs, Behance, or dedicated freebie websites. While quality can vary, these are excellent for building an initial collection.
-
Creating Your Own: For the ultimate customization, Illustrator allows you to create your own brushes from any vector artwork. This is a powerful way to tailor tools precisely to your needs.
When sourcing brushes, always check compatibility (ensuring they are for Illustrator, not Photoshop or other software) and review licenses, especially if you plan to use them in commercial projects.
Step-by-Step Installation Methods
Installing brushes in Illustrator is a straightforward process, but there are a few different methods depending on how the brushes are packaged. We’ll cover the most common and effective techniques. Most Illustrator brush files are saved as .ai files (Adobe Illustrator files) or as .ai files specifically designed as brush libraries.
Method 1: Loading Brushes via the Brushes Panel Menu
This is the most common and recommended method for installing new brush libraries.
-
Open the Brushes Panel: In Illustrator, navigate to
Window > Brushes. This will open the Brushes panel, which displays all currently loaded brushes. -
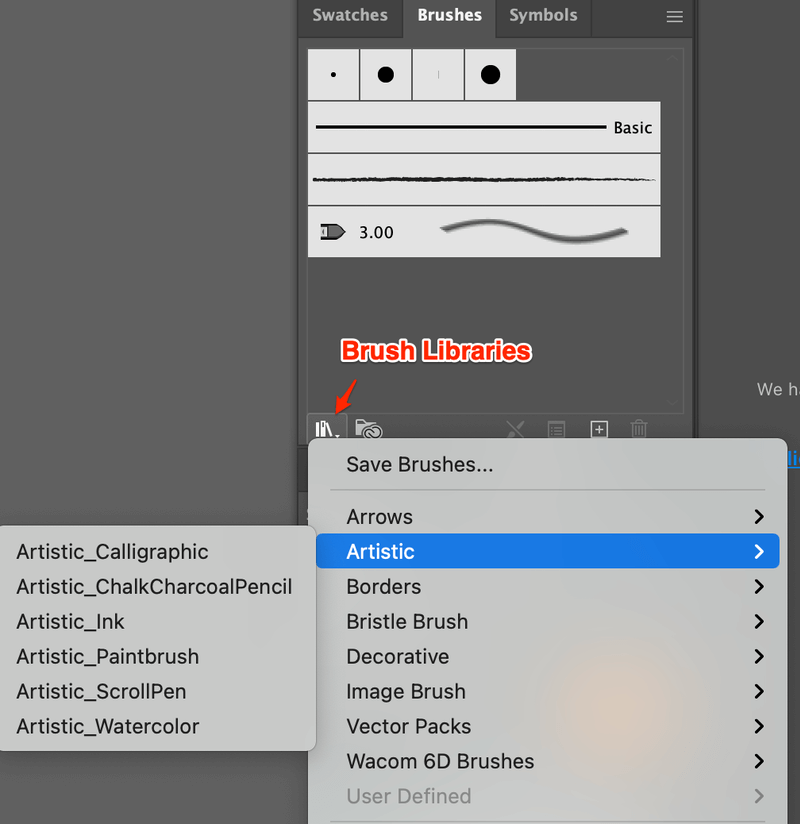
Access the Library Menu: At the bottom-left of the Brushes panel, you’ll see a small icon that looks like a stack of books or a library shelf. Click on this icon, or alternatively, click the fly-out menu (four horizontal lines) in the top-right corner of the Brushes panel and navigate to
Open Brush Library. -
Choose “Other Library…”: From the
Open Brush Librarysub-menu, selectOther Library.... This will open a file browser dialog. -
Locate Your Brush File: Navigate to the folder where you saved your downloaded Illustrator brush file (which will typically have a
.aiextension). Select the file and clickOpen. -
New Brush Panel Appears: Illustrator will open a new, separate Brushes panel containing the brushes from that specific library. These brushes are now available for use.
-
Permanently Add to Main Panel (Optional but Recommended): To make these brushes readily available in your main Brushes panel for future projects, drag the desired brushes from the new library panel into your original
Brushespanel (Window > Brushes). Alternatively, if you want all brushes from the library to be available in your default panel, you can click on the fly-out menu of the new library panel and choosePersistent. This makes the brushes available across all documents and in the main Brushes panel.
Method 2: Drag and Drop an AI File (Direct Import)
If your brush set comes as a standard .ai file containing the brushes, you can often simply drag and drop it.
-
Locate the AI File: Find the
.aifile containing your brushes in your computer’s file explorer (Finder on Mac, File Explorer on Windows). -
Drag into Illustrator: With Illustrator open, drag the
.aifile directly into your Illustrator document window. -
Observe the Brushes Panel: Once dropped, Illustrator will usually recognize the brushes within that file and automatically add them to your
Brushespanel (Window > Brushes). If the file opens as a new document, you can copy any path using one of the brushes from that document and paste it into your target document, and the brush will be imported. A more direct approach is to use Method 1 if the file is explicitly a brush library.
This method works well for .ai files where the brushes are embedded or defined within the document itself, and is often simpler for quick imports.
Method 3: Manual Installation into Illustrator’s Presets Folder
For power users or those who want to ensure brushes are always available by default in the User-Defined section of the Open Brush Library menu, you can manually place the brush files in Illustrator’s presets folder.

-
Locate Illustrator’s Presets Folder:
-
Windows:
C:Program FilesAdobeAdobe Illustrator [Your Version]Presets[Your Language]Brushes -
macOS:
Applications/Adobe Illustrator [Your Version]/Presets/[Your Language]/Brushes -
Note: Replace
[Your Version]with your specific Illustrator version (e.g., “CC 2024”) and[Your Language](e.g., “en_US”).
-
-
Copy the Brush File(s): Copy your
.aibrush files into thisBrushesfolder. -
Restart Illustrator: Close and reopen Illustrator for the changes to take effect.
-
Access from Library Menu: Now, when you go to
Window > Brushes, click theBrush Libraries Menuicon (the books) at the bottom-left, you should find your newly added brush sets listed underUser-Definedor directly in the mainOpen Brush Librarylist. Clicking them will open them in a new panel as described in Method 1.
This method ensures brushes are integrated into Illustrator’s default library system, making them easily accessible without repeatedly browsing your file system.
Effectively Using Your Newly Installed Brushes
Once your brushes are installed, the real fun begins. Understanding how to apply and manipulate them is key to unlocking their full potential.
Applying Brushes to Paths
Applying a brush is incredibly simple:
-
Select a Path: Create a new path using the Pen tool, Pencil tool, Line Segment tool, or select an existing path in your document.
-
Choose Your Brush: With the path selected, go to the
Brushespanel (Window > Brushes). Click on the thumbnail of the brush you wish to apply. Illustrator will instantly apply the selected brush to your path. -
Apply to Strokes: Brushes are applied to the stroke of an object, not the fill. Ensure your selected path has a stroke color (even if it’s just black) for the brush to be visible. The stroke weight will often influence the brush’s appearance.
You can also apply brushes directly while drawing by selecting a brush in the Brushes panel before you start drawing with tools like the Paintbrush tool (B) or Pencil tool (N).
Modifying Brush Settings
Many brushes are highly customizable, allowing you to fine-tune their appearance:
-
Double-Click the Brush: In the
Brushespanel, double-click on the brush’s thumbnail or name. This will open theBrush Optionsdialog box. -
Adjust Parameters: The options available will vary depending on the brush type (Calligraphic, Art, Pattern, Scatter, Bristle). Common parameters include:
-
Size/Width: Adjusts the overall size or thickness of the brush stroke.
-
Angle/Roundness: For Calligraphic brushes, controls the angle and roundness of the tip.
-
Colorization: For Art and Pattern brushes, controls how the brush interacts with the stroke color. Options like
Tints,Tints and Shades, andHue Shiftallow you to easily recolor the brush. -
Scaling/Spacing/Scatter/Rotation: For Scatter brushes, these parameters control the randomness and distribution of the scattered elements.
-
Flip Along/Across: Flips the brush horizontally or vertically along the path.
-
-
Preview and Apply: As you adjust settings, you can often see a live preview on your selected path. After making changes, click
OK. Illustrator will ask if you want to apply the changes to existing strokes that use this brush. ChooseApply to Strokesto update existing artwork orLeave Strokesto only affect future applications.
Experimenting with these settings is crucial for getting the most out of your brushes and tailoring them to your specific design needs.
Organizing Your Brush Libraries
As your brush collection grows, organization becomes paramount for efficiency.
-
Custom Brush Libraries: Instead of cluttering your main Brushes panel, keep frequently used custom brushes in dedicated
.ailibrary files. Organize these files by category (e.g., “Ink Brushes,” “Pattern Borders,” “Texture Brushes”). -
Persistent vs. Non-Persistent: Remember that loading a brush library via
Open Brush Library > Other Library...opens it in a temporary panel. To make it persistently available in your main Brushes panel or for subsequent Illustrator sessions, you must either drag brushes to the main panel or use thePersistentoption from the library panel’s fly-out menu. -
Removing Unused Brushes: To keep your Brushes panel lean, use the
Delete Brushicon (trash can) at the bottom of the panel, or selectSelect All Unusedfrom the panel’s fly-out menu and then delete them. This helps prevent performance slowdowns with excessively large panels. -
Saving Default Brush Sets: If you’ve curated a perfect set of brushes that you want available in every new document, you can save your current Brushes panel as a default library. From the
Brushespanel fly-out menu, chooseSave Brushes. Save it in thePresets/Brushesfolder (as described in Method 3) to have it appear in yourBrush Libraries Menu.
Troubleshooting Common Installation Issues
While installing brushes is generally straightforward, occasionally you might encounter issues. Here’s how to address common problems.
Brushes Not Appearing
-
Incorrect File Type: Ensure the file you’re trying to install is an Illustrator
.aifile or a compatible vector format. Illustrator cannot directly use Photoshop ABR brushes or other non-AI specific brush types. -
Wrong Installation Method: Double-check that you’re following one of the installation methods correctly. If you’ve placed the file manually, ensure it’s in the exact
Presets/Brushesfolder for your Illustrator version. -
Illustrator Not Restarted: If you manually placed files, you must restart Illustrator for it to scan the new location and load the brushes.
-
Corrupt File: In rare cases, the downloaded brush file might be corrupt. Try re-downloading it or testing another brush file from the same source.
-
Panel Glitch: Sometimes, the Brushes panel might need a refresh. Close and reopen the
Brushespanel (Window > Brushes), or even restart Illustrator.
Performance Considerations
Having hundreds or thousands of brushes loaded into your main Brushes panel can sometimes slow down Illustrator, especially on older machines or with very complex brush definitions.
-
Load on Demand: Only load brush libraries when you need them. Use the
Open Brush Library > Other Library...option and only drag the specific brushes you intend to use into your main Brushes panel. -
Purge Unused: Regularly use the
Select All UnusedandDelete Brushesoptions in your mainBrushespanel to remove any brushes you haven’t applied to your current document. -
Update Graphics Drivers: Ensure your graphics card drivers are up to date, as Illustrator heavily relies on GPU acceleration.
Managing Duplicate or Unwanted Brushes
If you find yourself with duplicate brushes or brushes you no longer need, the Brushes panel offers easy management:
-
Delete Individual Brushes: Select the brush in the panel and click the trash can icon at the bottom of the panel.
-
Delete Unused Brushes: To efficiently clean up a document, go to the Brushes panel’s fly-out menu and choose
Select All Unused. Then, click the trash can icon to delete them all at once. This removes brushes that aren’t applied to any paths in your current document. -
Prevent Duplicates in Libraries: When loading a library, Illustrator usually intelligently handles duplicates. However, if you’re manually copying files, ensure you’re not repeatedly adding the same library.
By understanding these troubleshooting steps, you can quickly resolve most issues and maintain a smooth, efficient workflow.

Conclusion
Installing brushes in Illustrator is a fundamental skill that significantly expands your creative toolkit. By understanding the different types of brushes, where to source them, and the various installation methods – from simple library loading to direct file placement – you gain the power to customize your design environment to suit any project. Effectively managing and troubleshooting your brush collection ensures a seamless and productive design experience. Embracing custom brushes is not just about adding new lines; it’s about unlocking new artistic possibilities, enhancing efficiency, and ultimately, elevating the quality and distinctiveness of your vector artwork. So, go forth, explore the vast world of Illustrator brushes, and let your creativity flourish!
aViewFromTheCave is a participant in the Amazon Services LLC Associates Program, an affiliate advertising program designed to provide a means for sites to earn advertising fees by advertising and linking to Amazon.com. Amazon, the Amazon logo, AmazonSupply, and the AmazonSupply logo are trademarks of Amazon.com, Inc. or its affiliates. As an Amazon Associate we earn affiliate commissions from qualifying purchases.