
Navigating the complexities of personal finance requires a proactive approach to monitoring your accounts and protecting your capital. For many cardholders, Chase represents a primary pillar of their financial life, offering robust rewards and high credit limits. However, with high transaction volumes comes the inevitable risk of billing errors, unauthorized charges, or unsatisfactory merchant interactions. Knowing how to effectively dispute a credit card charge with Chase is not just a technical skill; it is a fundamental component of modern financial literacy and asset protection.
When a discrepancy appears on your statement, it can trigger immediate stress. Whether it is a duplicate charge for a morning coffee or a significant unauthorized purchase from an overseas retailer, the dispute process is designed to protect your consumer rights. Under the Fair Credit Billing Act (FCBA), consumers have a legal framework that holds banks accountable for investigating errors. Chase, as one of the largest financial institutions in the world, has streamlined this process to be accessible via their digital platforms, yet the success of a dispute often hinges on the cardholder’s understanding of the nuances involved.
The Fundamentals of Credit Card Disputes and Your Legal Protections
Before initiating a dispute, it is crucial to understand the legal and operational landscape that governs credit card transactions. Disputing a charge is a formal process where the card issuer (Chase) intervenes between the cardholder and the merchant to resolve a billing error or a case of fraud.
Fraudulent vs. Disputable Charges
The first step in the process is identifying the nature of the charge. Chase categorizes discrepancies into two main buckets: fraud and billing disputes. Fraud occurs when your card information is stolen and used without your permission. In these cases, the resolution usually involves canceling the card, issuing a new number, and reversing the unauthorized charges immediately.
A billing dispute, on the other hand, involves a transaction that you—or an authorized user—initially participated in, but something went wrong. This includes being charged the wrong amount, not receiving the goods or services promised, being billed for a cancelled subscription, or encountering a merchant who refuses to process a legitimate return. Understanding this distinction is vital because the evidence required for a merchant dispute is much higher than that for a simple fraud report.
The Fair Credit Billing Act (FCBA)
The power behind your dispute comes from federal law. The Fair Credit Billing Act (FCBA) protects consumers from “billing errors,” which include charges not authorized by the consumer, charges that list the wrong date or amount, and charges for goods or services that were not delivered as agreed.
The FCBA mandates that you must notify the creditor in writing within 60 days after the first bill containing the error was mailed to you. While Chase allows for digital disputes, these timeframes remain a critical boundary. If you miss this window, the bank is no longer legally obligated to investigate, though they may still do so as a courtesy to maintain customer loyalty. This highlights the importance of the “60-day rule” in personal finance management.
Navigating the Chase Dispute Process: A Multi-Channel Guide
Chase provides several avenues for cardholders to challenge a charge. In an era of digital-first banking, the most efficient methods are through the Chase Mobile app and the online banking portal. However, more complex issues may require a traditional approach via phone or mail.
Disputing via the Chase Mobile App
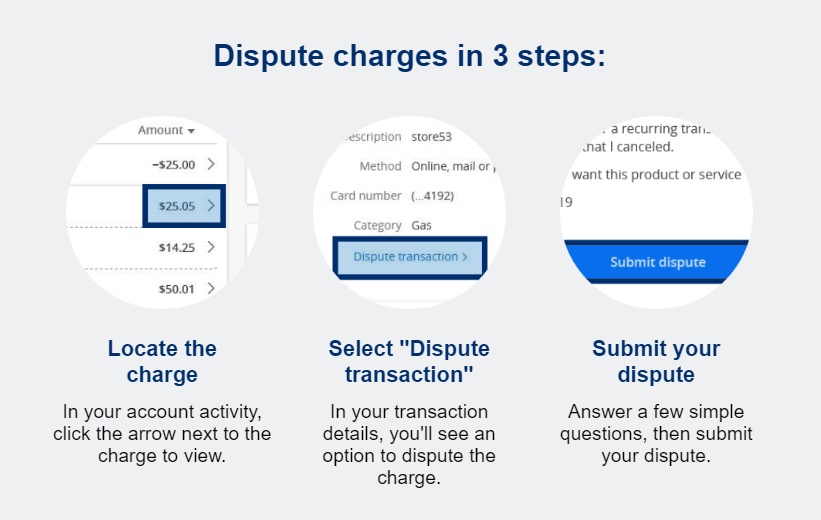
For most users, the mobile app is the fastest way to flag a transaction. To begin, log into your Chase Mobile app and select the specific credit card account where the charge appeared. Scroll through your “Account Activity” and tap on the transaction in question.
Once the transaction details are open, look for the “Report a problem” link. The app will prompt you with a series of questions to categorize the issue: Was it a duplicate charge? Did you never receive the item? Was the quality poor? By selecting the most accurate reason, you help the Chase investigative team categorize the case correctly from the start. Once you submit the details, you can track the status of the dispute directly within the app’s secure message center.
Using the Chase Website and Online Banking
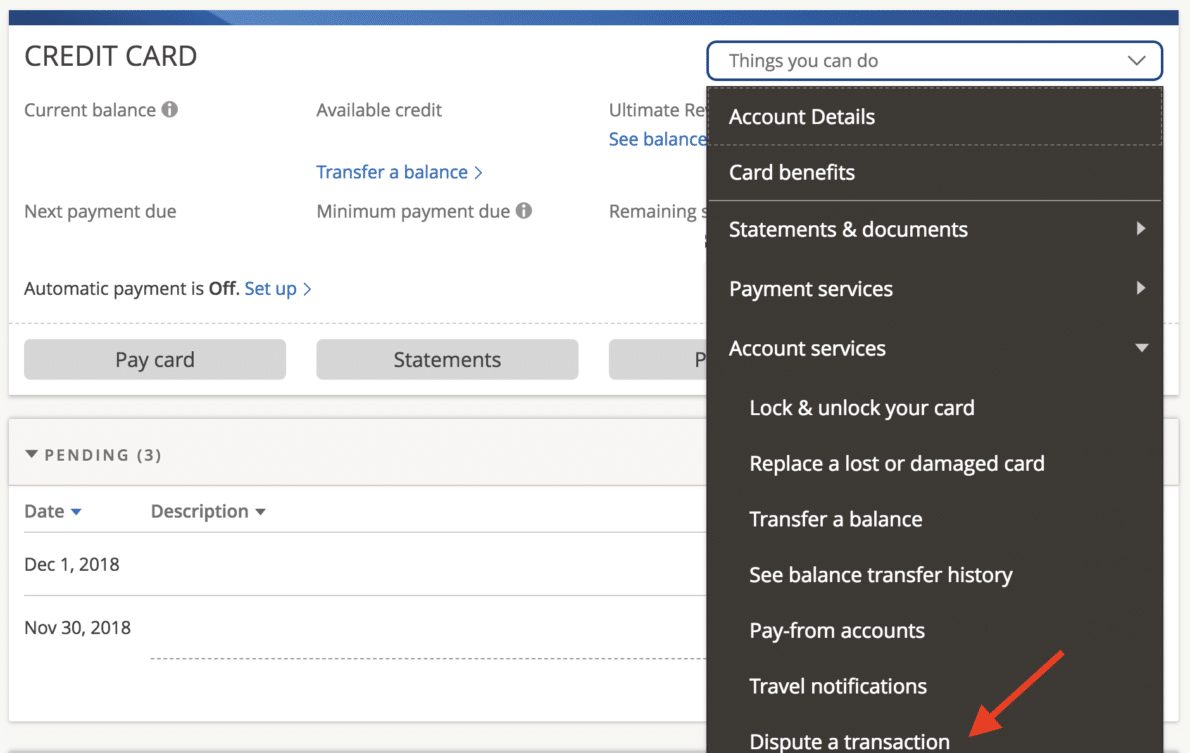
If you prefer a desktop interface—which is often better for uploading supporting documentation—the Chase online portal is the ideal choice. After signing in, navigate to your credit card dashboard and click on “See all activity.” Find the transaction and click on it to expand the details.
There, you will find a button labeled “Dispute Transaction.” The online system allows for a more detailed explanation of the problem. For instance, if you are disputing a hotel charge because of an undisclosed “resort fee,” the desktop version allows you to clearly articulate the timeline of events. It is highly recommended to use this platform if you have multiple attachments, such as emails or PDFs of receipts, to support your claim.
Filing a Dispute by Phone or Mail
While digital methods are preferred, calling the number on the back of your Chase card connects you with a customer service representative who can guide you through the process. This is often beneficial if the situation is nuanced or if you are unsure how to categorize the charge.
For the highest level of legal protection under the FCBA, sending a formal letter to Chase’s dedicated billing error address is the gold standard. This creates a paper trail that is legally indisputable. The letter should include your name, account number, the dollar amount of the error, and a detailed description of why you believe there is a mistake.
The Investigation Phase: Timelines and Expectations
Once the dispute is initiated, the clock begins to tick. Chase typically acknowledges the receipt of your dispute within 30 days. During this time, the bank begins an internal review and contacts the merchant’s bank to request evidence from their side.
Provisional Credits and Interest Adjustments
One of the most significant benefits of disputing a charge with a major issuer like Chase is the “provisional credit.” In many cases, Chase will temporarily remove the charge from your balance while the investigation is ongoing. This ensures that you do not have to pay for the disputed amount out of pocket, and it prevents interest from accruing on that specific portion of your balance.
However, it is vital to remember that this credit is provisional. If the investigation concludes that the charge was valid, the credit will be reversed, and you will be responsible for the original amount plus any interest that would have accrued during the investigation period.
The Merchant’s Right to Rebut
The dispute process is a two-way street. When you file a dispute, the merchant is notified and given the opportunity to provide evidence that the charge is legitimate. This might include a signed delivery receipt, a copy of their terms and conditions, or logs showing that you accessed a digital service. This “rebuttal phase” is why documentation is so important. If the merchant provides a signed receipt and you only provide a verbal claim, the bank is likely to side with the merchant.
Maximizing Your Success Rate: Documentation and Evidence
To win a dispute, you must treat the process like a small-scale legal case. The more evidence you provide, the harder it is for a merchant to refute your claim.
Proving a “Goods Not Received” Claim
If you are disputing a charge because an item never arrived, your best friend is the tracking number. If the tracking shows the item was never delivered or was sent to the wrong address, Chase can quickly resolve the issue. If the tracking says “delivered” but you don’t have it, you may need to provide a police report for “porch piracy” or a statement from the carrier that the package was lost or misdelivered.
Handling Service-Based Disputes
Disputes regarding the “quality of service” are the most difficult to win. If you stayed at a hotel that was dirty or ate at a restaurant where the food was cold, Chase may require proof that you attempted to resolve the issue with the merchant first. Keep a log of who you spoke to, the date and time of the conversation, and what they offered (or refused) to do. If you have photographs of the poor service or unsatisfactory product, upload them immediately. A clear photo of a broken item is often the deciding factor in a successful dispute.
Financial Implications and Next Steps
The resolution of a dispute can take anywhere from a few weeks to two billing cycles. Understanding how this affects your overall financial health is key to maintaining a high credit score and a good relationship with your lender.
Maintaining Your Credit Standing During a Dispute
While a charge is in dispute, you are still responsible for paying the rest of your credit card bill. Do not stop making payments on your account entirely. If the disputed amount is $100 and your total bill is $1,000, you should pay at least the $900 remaining to avoid late fees and negative reporting to credit bureaus. Chase will typically mark the disputed portion so that it does not trigger a “late” status for that specific amount, but the rest of your obligations remain.
What to Do If Your Dispute is Denied
If Chase sides with the merchant and denies your dispute, you are not necessarily at a dead end. You can request the evidence that the merchant provided to the bank. Reviewing this evidence allows you to see where your claim fell short. You may be able to file an appeal if you can provide new information that directly counters the merchant’s rebuttal.
Furthermore, if you feel the bank has unfairly denied a legitimate claim, you can escalate the matter by filing a complaint with the Consumer Financial Protection Bureau (CFPB). The CFPB monitors bank behaviors and can intervene if an institution is not following the guidelines laid out in the Fair Credit Billing Act.
In conclusion, disputing a credit card charge with Chase is a powerful tool in your personal finance toolkit. By acting quickly, documenting every interaction, and understanding your rights under the FCBA, you can protect your hard-earned money from errors and bad actors alike. Consistent monitoring of your transaction history remains the best defense, allowing you to catch discrepancies before they become entrenched financial burdens.
aViewFromTheCave is a participant in the Amazon Services LLC Associates Program, an affiliate advertising program designed to provide a means for sites to earn advertising fees by advertising and linking to Amazon.com. Amazon, the Amazon logo, AmazonSupply, and the AmazonSupply logo are trademarks of Amazon.com, Inc. or its affiliates. As an Amazon Associate we earn affiliate commissions from qualifying purchases.